Showing posts with label Geography. Show all posts

Thursday, February 20, 2014

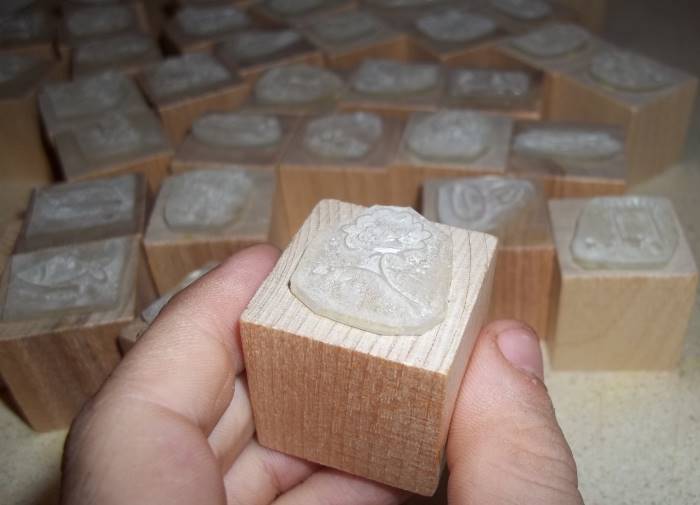
Montessori Economic Geography Stamps


The Economic Geography Stamps are now available for pre-order at Garden of Francis. (click here)

These are now shipping! They will begin shipping out prior to March 1. I am taking pre-orders to see if it is worth purchasing the tackle-boxes and the wood holders in bulk, or just buy a few at a time as I need them.

My son is so excited! 

(ok, I am too!)


I am so happy to be offering these for substantially less than the ONLY other set available anywhere online that I can find - and they correspond with our KotU geography album!

By the way, side-note: if, as we are using them, anyone wants a different stamp image made, the process I'll be using can very easily accommodate this! In fact, after this first batch of these ones, I am going to look into making stamps of other images for other themes.

Montessori Elementary Economic Geography Stamps - corresponding with the Keys of the Universe Montessori Elementary Geography Album chapter on Economic Geography.

Each  polymer (not rubber, but like rubber) stamp image measures 3/4 inch at its widest; mounted on a 1 inch square cube - with the image imprinted on the top of each cube for easy reference.

Select which set you would like: the core set contains 26 images of mineral, plant and animal resources; the supplementary set contains 14 additional images in more specific items.

Each corresponding tackle-box comes with a cardstock print-out of the included images for that set.

CONTENTS CORRESPOND WITH AMI MONTESSORI ELEMENTARY TRAINING ALBUMS. And are most specifically designed for Keys of the Universe albums.

Purchase your own ink pads according to the color designations of your choice (see the elementary Montessori geography album for further details).


EDITED TO ADD!!!!

With the process we are using to make these stamps, we can VERY easily create custom orders and we are looking to create designs related to the Faith (especially as related to the Catechesis of the Good Shepherd):

true vine, grapes, chalice, paten, altar, Good Shepherd, sheep, cross, dove, flame, shooting star, etc.

We are definitely taking suggestions! We can make them from 1/2" up to paper size.....


:)

Wednesday, January 9, 2013

Yogurt and Science

We make our own yogurt and the last few times, we've been using a simpler method that we LOVE - it's so easy!

When removing the milk from the pan and placing the jars on the counter, we always notice the layer of cooling milk on top.

This layer is mentioned in the first Great Lesson - The Story of God With No Hands - right before introducing the volcano... so it can easily slip into the recesses of one's mind when confronted with that *awesome* volcano!

This last yogurt-making was interesting though...

We were both working quietly in the living room and continued to hear a pop - pop - pop. Ever so slight.

Dreading the possibility of a mouse in our apartment, we crept into the kitchen....

and found...

This....

If you listen very carefully you can hear the quiet pop-pops - just barely. There are two other videos as well - both showing the same thing, but we couldn't decide which one to post!

Give it a try! Boil some milk in a glass jar by placing a 75-90% filled with milk jar into a saucepan of water and cover with a lid. Bring to a boil until the milk is about 160 degrees Fahrenheit. Now use a mitt to remove the jar and place it on the counter. Just let it sit. It won't take long!

Neat, huh!?

Wanna make yogurt while you're at it?

If you don't have a nice consistently warm place, do what we do and place that pan of hot water in a cooler which has been lined with a thick towel. Close the cooler for now to get it nice and warm in there.

(if you want to use raw milk and keep it raw, to make yogurt, you'll heat only to 110, but will not get a skin on the milk)

When the milk is about 105-110, mix in a spoonful of yogurt with active cultures. Put a lid on the milk culture and place it in the cooler next to the pan (best not to let them touch if the pan is still too hot - you don't want to kill the yogurt culture). Close the lid.

Come back in 24 hours (usually less but the 24 hours part is easy for us!).

To a pint jar, we add about 1 1/2 tbsp of sweetener (powdered sugar, honey, maple syrup, fruit juice concentrate) and whatever other ingredients you'd like. We are out of vanilla (still waiting for it to finish up) so we've been using almond extract - YUM!

Or mixed with homemade granola. YUMMIER!

It's pretty thick to start, but gets a bit runnier with stirring, so minimize your stirring if you want thick yogurt.

No pectin, no preservatives, our own sweeteners.

AND science!

Can't beat it!

Yes, those are wide-mouth Ball glass jars - we have been slowly switching over to just using those, instead of re-using other glass jars, because, well, we're not buying as many other glass jars as we make more and more of our own food from fresh produce. I chose wide-mouth because 1) the food doesn't clog up underneath a lip and 2) the same lids and rings fit on both pint (think jam) and quart jars - I really need ease of use and mis-matched lids have been hair-pullers in the last year! ;) Now I have multiple sized jars and just one size of lid that fits on all the jars. And everything looks so NICE in the cupboard, fridge and freezer!


After stirring it is just a bit runnier than organic yogurt.

Just as thick as well-stirred non-organic yogurt.


In the cooler; we make 4 jars at a time.

Saving the last half of one jar as the culture for the next batch.

Wednesday, March 28, 2012

Celestial Alamanack - Homeschooling style :)

The latest Celestial Almanack by Classical Astronomy at Fourth Day Press is here!

Homeschool astronomy - Montessori, classical, unschooling - any educational method! Including for us adults who just missed out ;)

Biblically-based, written by a homeschool father, up-to-date, beautiful, multi-age and multi-ability - you can't beat it!

See a free preview by clicking here.
Enhanced by Zemanta

Sunday, October 30, 2011

Heights and Depths of Geography

What is geography? What do you think of when you hear the word geography?

Memorizing the names of countries and capitals? Labeling maps?

Perhaps you go a bit further and consider the trade that occurs within countries and between countries?

Or perhaps you are familiar with the 5 themes of geography or the 18 standards that replaced the 5 themes found at the National Council for Geographic Education.

Geography is even more!
Geography is the study of the earth and its living creature; the earth's place within the universe, the depths of the earth, the heights of the atmosphere and those things joined to the earth naturally or through man-made means.

Geography studies the layers of the earth, the life that lives in every area, the moon that orbits the earth, the cultures of people who live in each region, and still more.

To receive a full scope of all that geography entails, let us look to how the Montessori method presents geography, within a context of cosmic education:the idea that all subjects are inter-related so no subject is truly taught in isolation:

The youngest children (the infants and toddlers) are first given their own culture: mother and father's loving arms, the stories they tell, their ways of speaking and interacting.


[caption id="attachment_490" align="alignleft" width="150" caption="Sample of a primary Montessori puzzle map"][/caption]

Primary children (ages 3-6) are participating more and more in that culture, really honing in on the exercises of practical life (designed to suit their particular culture, and as they reach ages 5 and 6, exposure to the practical life of other cultures). They are given globes to show land and water, then the continents, then the oceans, then the climactic zones. Puzzle maps of the world and of the continents are designed to not only show general placement, but to show the location of the capitals (each continent map has its knob approximately at the capital of that country). Flags for each country, cultural folders (or drawers), exposure to other languages, stories and books about children from around the world, lead the children on an exploration of the keys of the world - their world, where differences and similarities are equally celebrated.

[caption id="attachment_491" align="alignright" width="225" caption="Perpendicular and Oblique Rays of the Sun"][/caption]

Elementary children (ages 6-12) are now ready to take on the universe. We begin geography and history with the First Great Lesson: the Story of God with No Hands (or the Creation of the Universe Story). This story introduces the layers of the earth, states of matter, the beginning of time, universal laws and the obedience of all created things to that law. Subsequent lessons within geography present laws of gravity, physics, astronomy, geology, culture, economics, and more.


The table of contents for the elementary Montessori geography album includes the following (note that this list does not include each of the sections within each presentations, which can span anywhere from 2 to 10 sessions, within any given week or over the course of 1-6 years; also astronomy has been separated into a separate album according to Keys of the Universe Elementary Montessori albums):

Elementary Montessori Geography

Introduction to Geography
-Practical Considerations for the Experiments
-Notes on the Experiments
-Command Cards
-Geography Nomenclature
Chapter I: Creation of the Earth/Idea of the Universe
-God with No Hands
-Experiments with God with No Hands
-Notes on the Story
-Follow-Ups to the Story
-Composition of the Earth
-Further Details of the Composition of the Earth
-Formation of the Mountains
Chapter II: Nature of the Elements
-Three States of Matter
-Further States of Matter
-Different Ways of Combining
-Separation, Saturation, Super-saturation
-Attraction and Gravity
Chapter III: The Sun and the Earth
-Rotation of the Earth and Its Consequences
-Time Zone Chart
-Earth as a Sphere and Its Result
-Tilt of the Axis
-Seasons and the Two Tropics
-The Zones
-Zones’ Work Chart
-Protractor Chart
-Seasons Work Chart
-Protection of the Atmosphere and the Rains
Chapter IV: The Work of Air
-Experiments Prelude to the Winds
-The Winds
-Land and Sea Breezes
-Changes in the Winds Caused by the Seasons
-Rains
-Work Chart of the Winds
-Ocean Currents Caused by Winds
-Wind as a Sculptor
Chapter V: The Work of Water
-The River
-The Rains
-Ocean Waves
-Ice
-Water Cycle
-Spread of Vegetation
-People in Different Zones
Chapter VI: Human Geography
-Interdependence of Human Beings in Society
-Economic Geography
Chapter VII: Functional Geography
-Map work
Enhanced by Zemanta

Monday, August 9, 2010

Land of Oz Series

No - I'm not talking about the movie(s). I am talking about the *books*!

According to Wikipedia, there are 40 or so books attributed to the Wizard of Oz Club - a group of writers who added to the original 14 of L Frank Baum.

We have read the first 7 in our household, and I am currently on the hunt for the Volume 2 of the "Oz Chronicles" - a 3-volume set with the 14 original Oz stories (7 each in the first 2 volumes) and other stories by the same author. For the time being, we are really only interested in the original stories - off-shoots don't really do it for me and children can make their own judgments when they are older. We have a few of the first 7 in paperback as well, with illustrations. Our hardcover collection volumes have no illustrations, save the map within the covers, and my 6 year old LOVES them! Why? Because it is a beautiful hard bound, leather-look, gold-trim volume - with gold trim on the pages. How much more special is that???

But I digress. There are many lovely maps of the Land of Oz and I include the one below because it is the color version of that map which is displayed within our beautiful dark green volume 1.


See all the color? Each area of Oz has its own color and the inhabitants within each area are alike in some ways yet as diverse as paper is from china - you can find their respective towns on the map above ;)

We like to keep things faith-based - but frankly, some things are just too much fun! And knowing that others have taken off with the series will only encourage us to use our God-give imaginations to work things out for ourselves - don't we all wish there was a special place we could go? Just to get away from the grayness of life for a while?

There IS a place - that place is heaven. In the meantime, we have Oz ;)


Thursday, March 11, 2010

Montessori Homeschool Guides

Coming Summer 2010!

Montessori homeschool guides for primary and elementary.

Elementary Guide

Primary Guide

Catholic, general Christian and secular options provided.

PRIMARY:
These lesson plans will provide families with a support structure in which to introduce Montessori experiences with preschool and kindergarten aged children, without replacing an entire curriculum or purchasing ultra-expensive materials (or spending hours making everything!).

Based on the understanding of education as an aid to life and the Montessori principle of giving the child the world, these lesson plans will assist families in setting up an environment that meets the needs of each child in the home as well as those of the family unit. The youngest children will have real experiences with real objects, which will build a strong base for imagination, creativity and serious study at an older age.

This is NOT a complete curriculum, but is a supplement for providing a Montessori environment within the home.

Montessori is about more than work on trays or items laid out on shelves; it is about exploring the world that God created, learning real facts about real experiences; grounding oneself in reality while working to build one's own self, so that true creativity blossoms at the appropriate time.

Included will be outlines and details for setting up your homeschool environment in a manner that meets your children's needs where they are at, taking into consideration the younger (and older!) members of the household.

These plans will be easily adaptable to whatever curriculum already in use or can be used without any curriculum for this youngest age. It is intended to be a support rather than a replacement. Something to aide the family in putting cosmic education into place in their home.

ELEMENTARY:
These lesson plans will provide families with a support structure in which to introduce or continue Montessori experiences with elementary aged children, without replacing an entire curriculum or purchasing ultra-expensive materials (or spending hours making everything!).

Based on the tenets of *true* cosmic education, holding the central the concept of education as an aid to life, these plans will aid families in exploring the links that bring people and all subject areas together.

Included will be outlines and details for setting up your homeschool environment in a manner that meets your children's needs where they are at, taking into consideration the younger (and older!) members of the household.

These plans will be easily adaptable to whatever curriculum already in use, including unschooling. It is intended to be a support rather than a replacement. Something to aide the family in putting cosmic education into place in their home.

Wednesday, August 26, 2009

Additional Notes for God with No Hands

Experiments for ‘God With No Hands’


EXPERIMENT 1: Three States of Matter 

Materials: small tray, 3 small identical clear glasses (ice, water, air), small thermos with ice cubes

Procedure: Hold up the glasses or place them forward one at a time, beginning with the ice. Identify each state: solid, liquid, gas.

Purpose: Show the three states of matter.


EXPERIMENT 2: Forces of Attraction 

Materials: large tray, large clear bowl half filled with water, smaller bowl with hole-punches

Procedure: slowly drop the punches one at a time, working first around the outside then into the middle; end when they start to come together.

Purpose: Show the attraction of objects; the coming together of particles.
EXPERIMENT 3: Model of a Liquid 

Materials: small tray, one small clear glass ¼ filled with be-bes or iron shot

Procedure: hold the glass up and tilt it slowly from side to side

Purpose: Show how particles of liquid will roll over each other.


EXPERIMENT 4: State of Matter and Heat

Materials: heat-proof pad, a heat source (i.e. hot plate, sterno-stove, Bunsen burner), pie plate with 3 smaller identical heat-proof (metal) cups each containing a solid (non-descript piece of iron, lead solder, wax or paraffin – as identical in appearance as possible), glass stirring rod on a small tray, hot pads just in case

Procedure: Place pie plate with contents on the heat-source and apply the heat evenly. Use the stirring rod and hot pads as needed to demonstrate changes or lack thereof and for emergencies. First turn the heat to the highest setting. When the wax has completely melted, turn the heat halfway down.

Purpose: Show how different substances respond to heat.


EXPERIMENT 5: Liquids Settle According to Their Weight

Materials: test tube rack, 3 test tubes, water (1/3 full), cooking/vegetable oil (1/2 inch), molasses (inch or so deep)
Procedure:
Lift up the tube of water. Pour the molasses into the water, as much in the middle as possible so doesn’t stick to the side – watch for its action; repeat with the oil and watch its action.

Purpose: Demonstrate the separation and settling of liquids and other substances by density.


EXPERIMENT 6: Volcano

Materials: decent-sized volcano of neutral dark color (i.e. chicken wire and paper-mache; reasonably light, likely hollow underneath for ease of movement), the mouth made of a heat-proof material (i.e. insert a metal cup during the construction, about an inch deep (fill in with sand before adding chemical if needed), glossy paint makes cleaning up easier; ammonium dichromate (filling the mouth about half-full, covered with a PINCH of sulfur, with another thin layer of ammonium dichromate); long match (fireplace match)
Procedure:
Light the match and ignite the chemicals.

Purpose: Demonstrate how heated particles burst out of the earth.

NOTE: The ash is slightly poisonous (absorbed through the skin): wear rubber gloves when cleaning up and dispose with hazardous waste. The children will use vinegar and baking soda in their own work.


Notes on The Creation Story


            God with No Hands is a slightly modified version of Mario Montessori’s publication in Communications in 1958, originally told by Maria Montessori. The story is not meant to give just one idea of how creation came about; it’s meant to contain some tidbits of factual information in a story format. One important aspect to think about is the language of the story. The language should not be the same as used in day-to-day speech. The descriptive language should be more dramatic, a bit more extraordinary. The tone of the story should arouse more than just the children’s interest but also his admiration and wonder if the idea of the universe has been presented properly to the children. The story can be told in one’s own words and the guide must be comfortable with the version of the story told; the children are sensitive to hypocrisy. The guide must love the story that is told; make the story the guide’s own; much practice allows for comfort in the telling.

            The story can be either told or read as the guide needs, but the tone needs to maintain enthusiasm and other aspects noted above. In the environment with children, the guide can return to the story and recount specific sections, or fill in forgotten pieces.

            Important points to keep in mind in learning, re-wording, and telling:

  • The idea of the immensity of the universe, in which the earth is set, incorporated in the story through appeals to the imagination.


            Up to this point, the child has been the center of the world, but now the elementary child is turning outwards and is ready to use his imagination. “The light from the nearest star takes 4 light-years to reach us.” “In the galaxy in which we are situated, it takes 100 million years for the light from outside the galaxy to get to us.”

  • Analogies should have particular meaning to the children: i.e. European children will not readily understand the size of Alabama and this detail may be adjusted according to the children’s experiences.

  • Everything we know started as tiny little particles; this matter has been constant throughout time: present at the beginning of time and rearranged but still present today and into the future. Leave out scientific terms such as protons, electrons, etc. for now.

  • Each little particle is given a set of laws to obey; every particle has to follow these laws: attraction to other particles, states of matter and their basic properties. The earth came together in its manner because of these laws. “In the beginning everything was very, very hot, but as things began to cool, particles came together according to their likes and dislikes and formed different substances. Some of those substances took on the solid state, others the liquid states, and still others became gases.” These laws must be in the story.[1]

  • Even without the word God, the idea of everything having its own nature must be included. The nature of each substance is inherent in its being.


When and How to Tell the Story

            The story sets the framework for all of their work in the elementary, so the children should ideally hear it on the very first day of school. All the children need to know how to do is to sit and listen; they do not need to read and write or know their math facts. New elementary guides with limited experience may want a day or two to get to know the children a little bit before telling the story, allowing for learning their individual personalities (who needs to sit next to the guide, rather than in the back causing problems).


            The story should be announced ahead of time, as with all the Great Lessons and some particular lessons, in order to build anticipation within the children. In the environment, the announcement should be made in such a way that the new children know they are expected to be there (they have no choice in the matter) and the older children are invited but have an option.


            The entire story should be told at one time, with all of the charts and the demonstrations. The guide herself must feel a sense of wonder in order to pass this sense of wonder onto the children.[2]


            The story should not be told on a day the guide is not feeling well; distractions and illness create a more intensely accident-prone environment. Best to wait until the guide is feeling better.


Follow-ups to The Creation Story


What not to do:

  • If the primary purpose is to stir up interest and rouse their awe and wonder, then the children should not be asked to write the story in their own words.

  • The guide should also not ask the children to copy the charts or to do the experiments.


What to do:

  • If the guide has stirred them up, you want to leave them stirred up, giving them time to think and reflect.

  • Generally when a story such as this one is told, the children are invited to return to their work or choose some work to do, and tell them that another day there will be another story.


            The children may ask you or an older child to re-tell the story or a part of the story. The guide can then pick up on the story or that part of the story, filling it in with more details. Focus on the aspects that seem to more greatly interest the child(ren) involved.


            Another possibility is to tell the entire story again, but thinking of it as a review of the important points listed above. Different words can be used, as well as different amounts of information in different places.             Sometimes the children do not ask for another telling, so the guide must take the initiative.[3] In either case, discussion can be entered into with the children on various pieces of interest.


            Additional demonstrations can be formed – remember that all of the following are just impressions brought in to take the children a little bit further:

  • the concept of “colder than ice”[4]

  • comparison of the sun to the earth.[5]

  • how long it takes light from the sun to reach us;

  • how far away is the sun;

  • are there are other planets in the universe (chart 2a)?

  • All the planets go around the sun (piece of heavy metal on a string, stretching it to various lengths as spinning it overhead)

  • Centripetal force (between sun/planets and planets/moons): the pull on the string

  • Why don’t the planets fall into the sun? (crumbled up paper; the planets have momentum of their own, as well as rotation, preventing them from succumbing the sun’s gravity in such a manner) – personal motion and centrifugal force

  • Continue to add others as interests of the children lead.


Potential Resources:

  • My First Book of Space, developed in conjunction with NASA: 0671602624

  • Other Creation stories for 9-12[6],[7]


[1] Adults tend to think of laws as prohibitions and limits, however, true laws give order to the world, to the universe, and positively define a creation’s identity, purpose and proper end.

[2] Get up to see the sunrise; go out to watch the stars. Rachel Carlson’s book, A Sense of Wonder, is an excellent tool to heighten one’s sense of nature and the world around.

[3] Most particularly in new environments without older ones to lead the younger ones, the guide must be more initiating with recalling the stories to the children.

[4] 2 glasses, both with crushed ice. Take their temperatures; add salt to one; retake temperatures. Which one is colder?

[5] Let the children mention the wooden hierarchical material.

[6] It is appropriate for 9-12 to hear other creation stories – the 6-9 year olds need just one so that they can focus on the scientific concepts at hand

[7] Among many others:  In the Beginning by Virginia Hamilton (Native American)